Enhancing the functionality of monitoring weather conditions in various cities can prove beneficial, but there may arise a moment when you desire to streamline your weather application by eliminating certain locations. This comprehensive guide aims to assist you in effectively removing a city from your weather app. It is important to acknowledge that the instructions provided may exhibit slight variations depending on the specific application you are utilizing. Nonetheless, the fundamental process remains consistent across most platforms.
Step 1: Opening Your Weather App
To commence the process, begin by accessing your weather application. On your smartphone, this can be achieved by locating the app icon either on the home screen or within the app drawer. A simple tap on the app icon will open it. In the case of desktop or laptop computers, you can typically find the app by searching for it in the start menu or applications folder.
Table: How to locate your weather app
| Platform | Steps |
|---|---|
| iOS | Swipe down on the home screen and type the name of the app in the search bar. |
| Android | Open the app drawer and find the app in the list. |
| Windows | Click on the start menu and type the name of the app in the search bar. |
| macOS | Open the Applications folder from the Dock or use the Spotlight search. |
Step 2: Accessing the Locations/Cities List
Once the weather app is open, the next step is to access the locations or cities list. In most weather apps, this option is found in the app’s main screen or within the app’s settings menu.
- For apps with the option on the main screen: Look for a list icon or “Edit” button, usually located at the top or bottom of the screen. Tap on it to open the locations list;
- For apps with the option in the settings menu: Locate the settings or menu icon, typically represented by three vertical or horizontal lines, a gear, or a set of sliders. Tap on this icon, then find and select the “Locations” or “Cities” option.
Step 3: Selecting the City to Delete
Within the locations or cities list, you should see all the locations that you’ve added to your app. Scroll through this list until you find the city you wish to delete.
Table: Typical visual cues for selection
| Visual Cue | Meaning |
|---|---|
| Checkmark | City is currently selected. |
| Minus icon | City can be removed. |
| Plus icon | City can be added. |
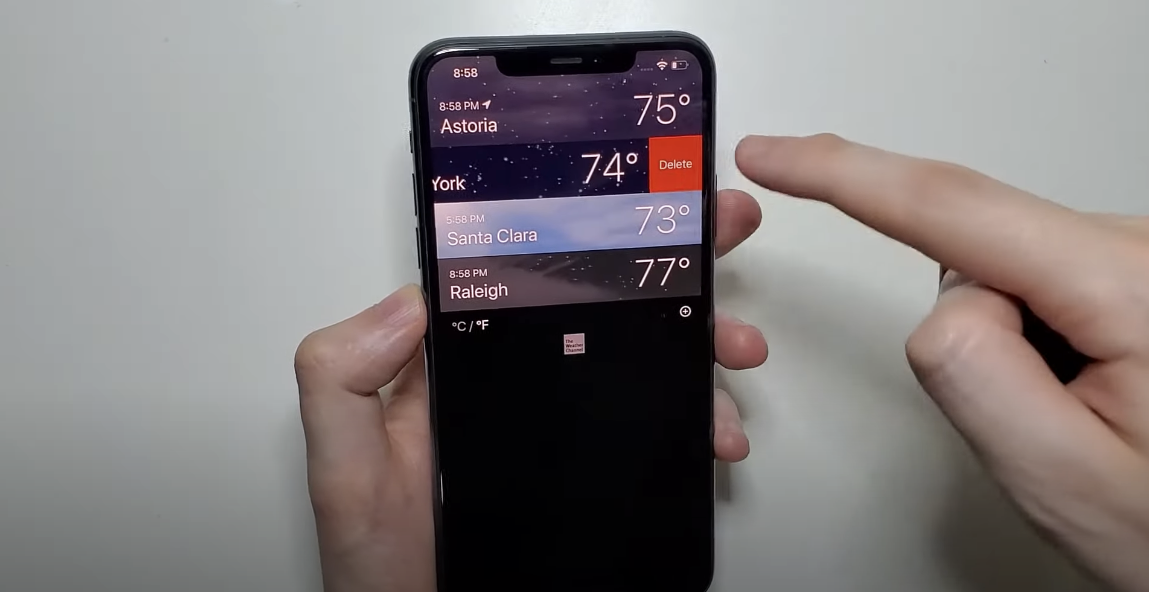
Step 4: Deleting the City
Once you have identified the city you wish to eliminate, the subsequent action entails its deletion. In the majority of applications, this can be accomplished by tapping on a minus icon, an ‘x’, or a ‘remove’ button conveniently positioned next to the name of the city. It is possible that a confirmation prompt will appear in the form of a popup window, seeking reassurance of your intention to delete the city.
Step 5: Confirming the Deletion
Certain weather applications may necessitate an additional confirmation step when deleting a city from the list. Should a dialog box materialize, requesting your confirmation, proceed by selecting “Yes” or “Confirm” to complete the removal process of the city. Conversely, if an option such as “No” or “Cancel” is presented, and you have reconsidered your decision, opt for this choice to retain the city within your list.
Conclusion
Removing a city from your weather application can be easily accomplished. Although the specific steps might differ based on the weather app you employ, the fundamental principles remain consistent. Simply launch the app, locate your city list, choose the desired city for deletion, proceed to delete it, and confirm the removal. This comprehensive guide aims to equip you with the necessary information to efficiently handle your list of locations.
FAQs
In most cases, once you confirm the deletion of a city from your weather app, the action cannot be undone. However, you can always re-add the city to your locations list by using the app’s “Add City” or “Add Location” feature.
If you cannot locate a specific city in your locations list, it’s possible that the city was not added in the first place. Ensure you have previously added the city to your list. If the city was added and you still can’t find it, try refreshing your app or restarting your device.
If you delete your default city, most weather apps will automatically set another city from your list as the new default. If no other cities are on your list, the app may default to showing weather information for a major city, your current location (if location services are enabled), or prompt you to add a new city.
The number of cities you can add to your weather app varies based on the specific app. Some apps allow for unlimited cities to be added, while others have a set limit. Check your app’s “Help” or “About” section for information specific to your app.
Many weather apps allow you to rearrange the cities in your locations list. This can usually be done by pressing and holding the city name and then dragging it to its desired position. However, the process may vary between apps, so refer to your app’s user guide for specific instructions.
If you’ve accidentally deleted a city from your weather app, you can easily add it back by using the app’s “Add City” or “Add Location” function. This typically involves going to the locations list, tapping on a plus icon, and typing in the city’s name.